Wednesday 30 November 2016

Infinity Winter Soldiers


The long awaited Winter Soldiers event finally came the other weekend. It lived up to its name as the venue was right cold when we got there! But it was a fun day nevertheless. Our mates managed to get last minute tickets so most of our group traveled and I think it was the first time we managed to get 1st, 2nd and 3rd place for Leeds. Unfortunately, I was not in one of those top places, I was somewhere near the bottom.

To my defense I took my Japanese Sectorial Army and my army list is pretty bad, its just made of the only 13 JSA models I have. But they are fully painted and quite nice, so I wanted to take them to an event for a long time now. If nothing else it allowed me to just have fun with the games, which I enjoyed.

This event stood out because it had massive price support. Like they filled two long tables with just stuff to give out, everything from box sets to t-shirts to painting accessories, it was pretty cool and everyone walked away with something. Maybe for the next event I'll try harder to win something good.

My Army

I only had this one list. Everything in the photo below was in it, plus a WarCor. The Hakamari were with Light Shotguns, Kempei had Boarding Shotgun and my three Line Troops with Combi-Rifles were Medic, Hacker and Forward Observer.


Game 1: Frontline - JSA vs The Neoterran Angels
Won 6 to 3 (2 TPs)

You could say it was fate that I was matched against Tim in the first round. Tis was time to reclaim my honour. It was an epic battle of wits and skill, and I, Pete the Destroyer, have won the day! ... okay I might have exaggerated a little. I actually won by accident. Here is how it really went down:


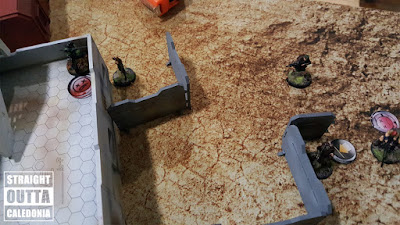
I won the roll in this game and decided to go first. I knew the army I was playing wasn't that good so I thought my best course of action would be to use my super ninjas to cut down as much of Tim's force as possible. I actually did not realize how crazy open the table was on one side, like I should have got down to check on ground level because it didn't look that way from top view. At any case, Tim chose the side with the better ARO positions. Since we were playing Frontline I deployed my army in a way that I thought would help me to get into defensible positions outside of my Deployment Zone (DZ).


After Tim deployed, I figured who the Lt was quite easy because it was the only option on the board. He deployed the Fusilier behind a building and on each corner had another unit, which I meant to take advantage of. I deployed my Oniwaban in Hidden Deployed just outside of Tim's DZ, near the building. Fortunately he passed his Infiltration roll too. So that was how my first turn started. I moved him as TO marker to the building, he was discovered by Aquila Guard but ended his movement outside of everyone's LoF so went back to TO marker state before moving out to shoot a Doctor with a Boarding Shotgun. The blast also hit the Lt, who was the main target.

It worked, Tim failed all Dodge and ARM saves on both units. The Oniwaban also took a shot at Auxilier, but I think I only killed his Flamer REM. The rest of the turn didn't go as well. Tim had me locked down in my DZ with two Total Reaction HMG REMs, Aquila Guard with HMG and also Hexa sniper that appeared later. I tried to use one of my Missile Launchers to take some of them out but it didn't work. Both of my Fireteams were unable to move.


Since Tim was in Loss of Lt, he just spent his whole turn killing my Oniwaban with the Aquila Guard (after spending all his remaining Command Tokens to make Regular Orders) and then moving back to the same place. I think he might have reveal some of his other TO tokens but not much else happened since all my stuff were hidden.

My second turn was pretty uneventful. My two remaining Haramaki just cancelled their own Extreme Impetuous Orders and my other Fireteam, still on 5-men, tried to attack the Hexa but failed. So I focused on my Domaru instead. He walked into the building in front of him, getting shot by TR HMG REMs and other AROs but Dodging them all, like a boss. He then spent remaining Orders on taking shots at Tim's second Flamer REM but did nothing to it.


Luckily for me, Tim was kind enough to kill the Flamer REM himself by walking it into a mine in plain sight! He was trying to use it against my Fireteam but forgot about a mine he discovered in the previous turn (it was on a roof, placed there by Yuri's Minelayer skill). Since he wasted the Orders already, Tim used the Auxilia to attack the Fireteam but got killed too. He then also moved two of his TO markers towards my DZ.

The last turn was just about trying to get everyone into some zone. One of the Haramaki survived all the AROs as they just run forward. The Fireteam moved into a building where it was safe from AROs and I hoped it took them out of the DZ, or at least two of them. It did appear far enough. Most of my Orders I spent on Shinobu. She was deployed where I thought she could use Smoke to block LoF so the Fireteam could advance, but Tim had too many AROs so I didn't see the point using her sooner. I managed to move her into the furthest zone from my DZ and put her into a building where she'd be hard to reach if Tim wanted to go kill her. I did give him a free ARO by mistake, which made him reveal Swiss Guard Hacker but I rolled double 14 for ARM save against his DA Multi-Rifle!


Since my army was so spread out and not much left of it, Tim had more or less free reign around the board. The only wildcard was that I used my Classified Card for zone points while Tim used it as Objective. First Tim moved one of his TR REMs, the Aquila and Sniper Hexa into the zone in front of his DZ (where I had Shinobu) to make sure he had control of it. Since the zone in front of my DZ would give him the most points, Tim moved his TO marker and the Swiss Guard there. He tried to hack my HVT with it. The first time failed and with second attempt, he moved really close to the building where my Fireteam was. My hacker tried to hack the Swiss Guard but I had no way of killing it.


In the end, Tim did control the zone in front of his DZ. I had control over the middle zone as I had Domaru there and Tim had nothing. Then it turned out my whole Fireteam did not make it out of my DZ and the Swiss Guard walked into my DZ too! So all Tim had was one TO Marker, which was another Hexa. I had Warcor, Yaozao REM and a Haramaki, then I added extra 20pts with my Card to win that zone! So Tim basically lost by moving his Swiss Guard too far, and that is how I won by accident. 

Game 2: Decapitation - JSA vs Neoterran Capitaline Army
Lost 4 to 10 (0 TPs)


I thought I could do better in the second round as the mission was Decapitation and I had one of the best assassins in my army. Looking back though, I chose deployment zone instead of the first turn (I won Lt roll), which did not turn out to be as good. At that time I just thought I could bunker down and let my opponent spread his army a bit. Unfortunately Kai, my opponent, had sensor bot near his Lt and expected me to have ninjas. Which gave me a "smart" idea of deploying Shinobu on a roof. Oniwaban I deployed near my Lt for added surprise protection.


The first turn went okay. Kai was worried about my Missile Launcher so he didn't advance with anyone but he did bring in some ALEPH AD REM unit which he gave Marksmanship Lv2 and it took care of my Missile Launchers real quick. I had really bad luck with rolls, whatever I rolled, he managed to get 1 or 2 higher. The only other thing that moved forward was a Pathfinder REM with a little Flamer pal. Which I did take out in ARO from Hakamari.


My first turn was pretty uneventful. Since Kai did not move most of his army I could not get Shinobu safely down from the three-stories building or even do like a lean-out to at least shoot the Lt. I was saving that as the last turn measure. Instead I moved Yuri close to the other units to get me back to full 5-man Fireteam and positioned them to face the AD REM that was on my right flank. I also tried to heal my Missile Hakamari but managed to kill him.

Turned out, the Fireteam was barely a speed bump for the REM who just managed to out-roll me in every way again. Kai killed 3 of the 5 troops and then found a path that I did not see to speak up on my Lt. My rolls were again pretty bad and he managed to kill my Domaru. The only benefit was, it ate all his Orders.


I chose Kempei to be my next Lt and then used him to take out the AD REM. At least his Boarding Shotgun worked to kill it. The stupid thing on my part was, I did not count the Orders properly and when I had none left he was standing up instead of hiding on the roof Prone.

Kai first went to attack my exposed Lt with his Bulleteer REM. Thankfully I was able to Isolate it with surviving Hakamari before it got too close. It did not help as Kai still had enough Orders to get his Bolt Fireteam into position and shoot my Lt with a Missile Launcher. I of course failed all the rolls.


In my last turn I did not even attack with anything, there was nothing I could do and killing one Lt would not help me so I kept Shinobu hidden for Victory Points (surviving army points). The only Objective Points I had in the end was from Classified, I did Forward Observer an unconscious REM and then did Coup de Grace it in the first turn. Kai on other hand did one of his Classified, Secured HVT, killed more Lts and more Army points (I barely killed anything of his).

Game 3: Biotechvore - JSA vs Ariadna
Lost 1 to 8 (0 TPs)


Somehow in the last game I was paired up against James (my mate from Leeds). I knew I had no shot at ranking well and not much chance against his 12 camo markers list either, so I decided to just have fun with the mission. I selected to go first and wanted to at least get my Classified and then use my super ninjas to take out as many of his units as I could. Unfortunately I deployed my big Fireteam in a stupid place and James took advantage of it by placing a Briscard with Rocket Launcher in their LoF. Thankfully though, he failed all but two Infiltration rolls.


In my first turn the Hakamari Missile Launcher did Discover & Shoot against camo markers he could see and killed at least Uxia, I think I liked one more later one too. Then I had to go deal with the Briscard before anything else. I also hoped the camo marker next to him was Spetsnaz. I sacrificed my Oniwaban to have a shot. The Shotgun blast killed the camo marker which turned out to be a Cateran, but the Briscard escaped. At this point I was under the impression that Biotechvore Zone kicks in at the end of the whole turn so I left my AROs weapons in the virus zone to stop James' advance but only half way through his turn we realized you do the BTS checks at the end of your Active turn. Which resulted in most of my army dying to the virus.


Though before we realized that my Keisotsu Missile Launcher was absolute boss, killing every Impetuous unit James had. Even managed a double crit in one roll! The fact he died to the zone did not change much as my other Missile Launcher survived and also kept hitting. James spent his turn just advancing all his unit and camo markers. He left very few in the virus zone.


The rest of the game wasn't much different. My army was dropping like flies and James kept moving camo markers around. I didn't realizing during the game, he told me afterwards, that at one point I revealed his camo Lt but he quickly went back to camo. My own Lt went balls out and just hunt down camo markers, even getting into CC. That was in my last turn. I also stayed Engaged with the unconscious Foxtrot so when James was shooting at my Lt with the Birscard, he hit his own unit twice but both times passed the ARM rolls. But the third time he managed to hit my Lt failed and I failed all of his rolls.


In the end he didn't get full 10 Objective Points because I somehow managed to kill more than half of his army. To my frustration he didn't even take Spetsnaz in this mission, and I was hunting for it the whole time!

Thursday 24 November 2016

Northern Open 7 - The Morat Suicide Squad


It was rather unexpected but in the seventh Norther Open I had a shot at the top ranks! I was at the top table in the last game but didn't win, story of my Infinity life. I say it was unexpected because I took my Morat Aggression Force and planned to play for fun more than anything else. Albeit as fate would have it, I was matched against players that have not known about Morats much and was able to pull some good wins.

So I found myself matched against Al in the final and on the table next to us was James against Ben, also good players. I didn't know what the difference in points was between us but because the last mission had such a big swing, any one of us had a shot at the first place. I ended up on 6th place out of 26 people which I am happy with.

The day was a really good fun (despite waiting an hour in the morning cold for the caretaker to open the venue). I noticed lots of new players which was great, hopefully they'll come back next year with some more new players. Also met few people who read this blog, which is always cool!

Greg from the Plastic Crack Blog also made a video about the event. It has some nice footage of the tournament and the games.

Army Lists

List A
List B

Game 1: Tic-Tac-Toe - Morats vs Imperial Service
Won 10 to 0 (3 TPs)


I won the Lt roll against Adam, a new opponent for me, and chose deployment. I wanted to take the side which seemed to have easier access to the objectives and wasn't bothered if I go first or second, I planned my army to do either. Adam chose to go second because the mission is scored at the end of the game. Which is not a bad decision but I had the advantage of counter-deploying and going first. Adam deployed two Total Reaction (TR) Remotes, on roofs of each side of the board. Made me glad to go first because I was able to deploy my Vanguards to deal with one and my own TR Remote to deal with the second. At least that was a plan. Anyat was deployed on my right side to grab objectives, Adam's force was mostly on my left flank.

Sticking to my plan, I spent the first turn killing the two TR Remotes. I was able to take them out because on one side I had full 5-man Fireteam, and my TR Remote had advantage of having Mimitism and I also gave it Marksmanship Lv2 with my EVO Hacker. I did spend extra orders shooting the damaged Remotes to kill them fully because I knew Adam had Engineer on the board. The rest of my first group Orders I spent on taking objectives. Anyat took the one on very right while Vanguard Paramedic and Forward Observer took the middle and left one, so I had all three in front of my Deployment Zone. With the second pool I sent my Krakot Renegade to take a shot with Boarding Shotgun at one of Adam's Su-Jians. I did one Wound and completely forgot it had STR 2 and No Wound Incap. It was a waste of my Renegade as he died in the process.


In his turn, Adam was very focused on killing my Vanguard Fireteam. They did block his access to objectives on my left. Using Fireteam Duo, Adam linked the Su-Jian and sent them both to deal with the Vanguard. With their 8" MOV, Adam was able to Cautious Move across some wide gaps and position his units well to minimize the AROs he was going to take. Combination of Heavy Shotgun, Flamethrower and Spitfire managed to fully kill both of my Forward Observers and put my Missile Launcher unconscious, leaving me with Paramedic and HMG Vanguard. Though lucky for me, the Missile Launcher managed to land two missiles and kill one of the Su-Jian before he went unconscious. With few Orders left, Adam did a tactical retreat into safer position for his remaining Su-Jian and also took an objective with his Engineer unit.


Since we were playing quite slow the second turn was going to be our final turn. We agreed on this during the first turn to make make sure neither would have an unfair extra turn. Keeping this in mind, I have spent most of my Orders on Anyat. With her Climbing Plus and no threats on my right flank, she took two more objectives. I was aiming for one more but failed WIP roll despite the +3 WIP from EVO bonus in this mission, so instead spending more Orders on her I went to heal the unconscious Missile Launcher, who fortunately passed his -3 PH and came back. I am pretty sure I used my second Order pool to just send Hungries forward, but whatever they did it had no impact on the game. I ended my turn with 5 Objectives, three in front of my DZ and then two further up on right flank. 

I think Adam planned to take all three objectives on my left, but was still troubled by my 3-men Vanguard Fireteam. Adam tried to use Smoke to block their LoF instead of attacking them, I am guessing because it didn't work as well last time, but got tunnel-visioned on getting that Smoke down. Which wasn't easy because he was doing a Speculative long range shot with Smoke Grenade Launcher. He kept rolling really high and when he did land it eventually (after realizing he could just stand up with the unit and have better odds), he was left with too few Orders so he wasn't able to take the Objectives he needed.


In the end I ended up with 10 points because I had 3 objectives in a line, I had more Objectives overall, I had one over the half line and I did my Classified (which was to heal someone). It was a good game though, I think Adam just made the mistake of focusing too much on my Vanguard Fireteam instead of going for the objectives and taking those that my Fireteam couldn't see as many of them were blocked by the infinite height Objective Room.

Game 2: Engineering Deck - Morats vs Ariadna
Won 6 to 3 (2 TPs)


The second game was very different. The table we got had very little to no scatter terrain which posed an interesting challenge and then John, another new opponent, said he is playing Ariadna. I know how deadly Ariadna can be. In a way it was nice to have a good guess at what all the camo markers were but at the same time, I just knew how hard it will be to deal with them. John took second turn for this mission as he won the Lt roll so again I had the advantage of being able to chose the side and counter deploy to John. I chose the side which seemed to have better defensive position for my Vanguard, neither side had the higher vantage point.


In my first turn I started by using my Renegade to do Discover & Shoot against camo marker in my half of the board, which I guessed was Uxia. Turned out I was right and she died. Then I went on causing some more damage with Hungries Fireteam (Vanguard were not linked yet). John had Col. Voronin, which I guessed was the Lt but better targets presented themselves on the way. I used the Hungries as a bait to reveal two camo markers on my left which were Foxtrot and Chasseur Specialists. While I still had enough Hungries for +1 Burst, I sent one Chain Rifle Hungry to attack a Kazak Paramedic and a Veteran Kazak. Luckily for me, the Vet Kazak failed to Dodge and then failed both ARM saves, the Line Kazak did as well. With last Orders the other Hungries attacked the Foxrot in CC and killed him.


With my main (first) Order pool, I advanced with Vanguard HMG, Kornak, HMG Remote (I did give it Marksmanship Lv2 as well) and Anyat. I took the Objective on my right with Anyat, everyone else went to cover and Supressive Fire. My REM was feeling cocky and I put it on top of a cargo crate to have better view. I knew John had Antipodes on my right flank so I wanted to have lots of AROs against them. Since I couldn't see anything to shoot at, I moved Anyat to the middle of my DZ so she was close enough to make my Vanguard full 5-man Fireteam again as she can link with them. I also tried to get the objective on left with my Engineer but failed the WIP roll.


John started his turn with Maverick, using her Impetuous Order to try put down Smoke Cover. Unfortunately for him, she went bit too far and faced three AROs (HMG, Kornak and Vanguard Missile Launcher). John chose to use the Smoke to go opposed with everyone but rolled 1, which made my ARO rolls easier. She was obliterated. John then used a different unit (Antipod Controller I think) to lay down Smoke from outside of my LoF. With my AROs blocked, he was able to get his Antipodes into combat with my HMG Rem and kill it. Though thanks to Electric Pulse one of the Antipodes was Immobilized. John then jumped the other two Antipodes into CC with my HMG Vanguard, only too late realizing they would get shot as they are jumping into CC. They faced lots of AROs and also got Missle Launchered.


With the rest of his Orders John revealed Sniper Spestnaz to kill my Oznat who was with the Hungries. He also then revealed Tankhunter Autocanon that managed to kill Kornak, I rolled bad for ARM saves. The Tankhunter did try to also kill my Missile Launcher but because he was in the open and I was in 5-man Fireteam, the odds turned out in my favour and I killed him too, though admittedly I did roll a crit (Missile Launcher for the win though, such a high kill count). Before end of his turn, John used his Chasseur on my left (where Hungries were) to take an objective.


Again, we were playing slow and agreed second turn to be the last as we were close to running out of time. I started with remaining two Hungries, one run into CC with the Chasseur and killed him. The second one run out into open, but survived a shot from Spetsnaz (this becomes important later). I had my Vanguard HMG facing the Spetsnaz but I didn't want to risk shooting without having Fireteam support. So I spent four Orders moving the other four Vanguard across a building (I had to climb, move across the roof, climb down and then move forward). If you are wondering, yes I was in Loss of Lt but Morat units don't care, they act normal. Only REMs and Hungries were Irregular. I then used Command Token to make a full Fireteam and shot the Spetsnaz. The odds were still not great, I was on flat BS 11, (+3 range, +3 Fireteam, -3 cover, -3 camo), while the Spetsnaz was on BS 15. However, I had 5 rolls and John had 1 so I was feeling confident. It helped I managed to roll a Crit and another hit, which killed the Spestnaz completed as John failed ARM save.


I then went on getting a second Objective with my Engineer, he passed his WIP roll this time. I really should have thought about my Orders more at this point as in the end, I was left with 1 Order to open the doors to the Objective room and get inside. I completely forgot they could fail the WIP roll... which they did! So I had a whole Fireteam just sitting there in front of the doors. Not good. With my second Order pool I moved my last surviving Hungry to hide behind a container but close enough to John's HVT so I could change my one of my Classified to Secure HVT and get 1 Objective Point.


John in his turn, was again focused on making a Smoke path, this time to the Objective room. He had limited number of Orders so it didn't help him failing like two rolls. When he did make it, he moved one of his Camo markers through the Smoke into the room. He had a choice of going for the objective inside but once the doors were opened I had two Vanguard looking inside so he'd take four ARO shots. John decided to hide in the building instead to get himself 3 Objective Points. If he went for the Objective, managed to pass the WIP roll and survive, he would have won, but if he didn't survive he'd still lose and have less Objective Points so I think it was the better choice not go for it.


I had luck on my side for sure with two good Crits in this game. I could have done better by going to the Objective Room sooner but I didn't like the idea of being inside with no cover. From my perspective John made the mistake of focusing too much on the Smoke. Again because of the Objective Room I think it would been easier to sneak around and get Objectives, ignoring all my ARO units. John also forgot about the objective on his left (my right side). After the game he did say that he didn't know what Morats can do, and I do believe people underestimate giving someone first turn and the Deployment Choice in missions like these. Sure going second gives you advantage for end of the game objectives but it can leave you vulnerable to Alpha Strike.

Game 3:  Seize The Antennas - Morats vs ALEPH
Lost 3 to 6 (0 TPs)


In the last game I found myself at the top table (unsure if I was 1st or 2nd at this point). I did not expect to be matched up against Al so soon after the last event, feels like we are playing every tournament lately! He was playing ALEPH again so I was expecting Achilles and Hector like he had used before but he surprised me with a new list, which had neither. Though even if he did, it would not change my tactic for this game. It was time for the Morat Suicide Squad. Keep in mind I did not go into the tournament planning to place so well so my list for this mission was based off my old 11-Hackers list, though this time I had only 6. I did not think I could beat Al in the "conventional" way because I did not design my list to be high competitive.

The Morat Suicide Squad is actually a simple tactic but bit unorthodox. If you pull it off people might not like you for it but when you are playing for the 1st place, sometime you gotta go for the win. The idea is to use the very first turn to take as many objectives as you can and kill as many of your own units as possible, best case scenario you will be near or under the Retreat limit by the end of the first turn. You then leave your units in the open but near the objectives so your opponent has shoot them in their first turn. You should start your second turn in Retreat, as Morat you don't care because your Morat units still act normal and give Regular Orders, so you can try take even more Objectives and then the game ends at the end of your turn (this only works if the mission does have Retreat rule!).

So in the best case scenario, your opponent had only one turn. Now you see why I said its bit unorthodox?


I went into the game with this mindset and spent the first turn getting my Vanguard Hackers to the objectives. What made it difficult was an infiltrating TO Sniper. He could see into the objective room and covered my paths inside. I tried to kill him but had nothing reliable and Al's units all had No Wound Incap (NWI) which was really frustrating. I did almost manage to kill his Lt by accident. I didn't know it could have been the Lt but it was a unit with MSV Lv3 so I wanted it dead. Al failed two ARM saves but it stayed alive because of NWI, just like the TO Sniper. Al was very confused by me getting lots of my guys killed. I tried not to be too obvious about it but at one point did a Move-Move with my Sorogat which Al later said tipped him off the most but during that Co-Ordinated Order I wanted to give his Sniper a better target than my Hackers so they could get out of the Sniper's LoF and to the objective. Which worked and I managed to have two objectives at the end of my turn. I was also on 150pts left, so it didn't go as well as planned. But at least I had the Objective Room guarded well.

It was sometime during his turn Al realized what I was trying to do. Which was impressive but it did not make things easier for him because he knew killing my units will not help him. So he had quite hard time figuring out what he can kill but keep me from Retreat. We had lots of Hacking battles in his turn. But with my Hackers being just regular Line Troops I didn't do so well and lost my two Hackers inside the Objective Room. Even more annoyingly, I found out you can Heal from NWI so his Lt was back on 1 Wound. I think he used her to take an Objective in front of his DZ. He also dropped down two AD troops, one jumped down and the other just walked on. Sadly for me, Al didn't kill enough for me to start in Retreat.


In my second turn I tried to consolidate my defenses a bit more. I took out one of the AD troops with my HMG Rem and then moved it into a doorway of the Objective Room. It couldn't get inside but it could see inside, which was enough. I also moved up my other cheap REM that had Flash Pulse to give it better Line of Fire. The only things to die in that turn were my Hungries. I thought they could kill Al's TO Hacker that was near the objective room but she also had NWI! So annoying. At least I ended my second turn with just enough units that if any of them died, I was in Retreat.

I am not sure if Al knew that or not, but I'd think he had a good guess. He got more ballsy with his units to try take objectives from me, I still had two and he had one. He first used the second AD trooper to attack my Anyat and then my HMG Rem. I shot that unit so many times and even won most of the rolls but it kept passing ARM saves and in the end it managed to kill my REM. Which allowed him to move his Lt unit into the Objective Room facing only one ARO, which I won but he passed ARM the save. He also tried to move his TO Hacker and Engineer towards the Objectives but my cheap REM was on fire, it made both of them Stunned with Flash Pulse so those Specialists were unable to take the objectives. When Al moved his Lt further inside the room, she got into my Repeater range so I used Sucker Punch instead of shooting but only managed to put her back on NWI again. Leaving it to his very last Order, Al went for the objective and managed to pass the WIP and take it from me.

I still had my last Morat Hacker who became my new Lt (Sorogat who died earlier was my original Lt), Anyat and the cheap REM alive. The REM was in different combat group and I had no Command Tokens left so effectively I had three Orders to spend on the Hacker to run into the room and try take the objective back. Unfortunately for me the TO Sniper was still alive and also Al's Lt was able to hack my Vanguard, so he didn't survive trying to get to the objective. Since I started in Retreat Al didn't get his third turn but won anyway by having two Objectives to my one.


It was a really fun game and I enjoyed making Al sweat, it was sure a game I'll hear about from him again! Like that time I hid my Wulvers on a building he couldn't get to, so I'd win the game, he still talks about it whenever we meet. 

Killing 3/4 of your army in the first turn can be hard to pull his tactic off, but James had a suggestion to deploy on roofs and then when you have the objectives just jump off to kill your units... which would make it easier to put yourself in Retreat but nobody would like playing you again I'd think, so I don't recommend it. 

Tuesday 15 November 2016

Tic-Tac-Toe Practice

As of writing this article, it is less than a week from Northern Open 7 for which we have decided to go with objective missions not played before on the NO tournaments, or at least two of them weren't. Greg from The Plastic Crack Blog wanted to get some practice as did I, so we had a game of Tic-Tac-Toe last Sunday.

And I am glad we did because it really helped to try the mission and see what improvements our army lists could use. We both played Morats and it was a really fun game. We both had a Fireteam of Hungries but otherwise played different styles. I relied more on Vanguard Fireteam and HMG Remote, while Greg had Haris Fireteam of Yagoats and Sorogat Tempest Regiment to do damage.

The main thing we both took from the game was that you want to have EVO Hacker in the army because it gives all of your Specialists +3 for WIP to do Objectives, while the EVO is alive.

Greg won our practice game in the end by having one Objective more than me. His Sorogat took out all of my heavy weapons and then I couldn't kill it even after like three rounds of shooting it with Kornak in the open! The game was a proper bloodbath otherwise though, so many dead.

Greg did a timelapse of the game, plus some commentary about his army and paiting on Youtube:


I only took few photos during the game:


Monday 14 November 2016

Marauders Box Set


Recently someone shared pictures of the new Marauder Box Set in the Ariadna Facebook group. Remember those Marauders we have converted earlier this years? Soon we'll be able to put them to good use! Marauders, the 5307th Ranger Unit, are one of my favourite troops in USARF. In my opinion they are very reasonably priced and have lots of utility, especially in the American sectorial. I thought I'd share some ideas about the Fireteams I am thinking about using.

First though, let briefly look at the new models and the current Marauder profile.


In the new box set we'll get Boarding Shotgun, Heavy Rocket Launcher, Sniper Rifle and Molotok. No basic Rifle option though, so still worth converting those. First thing I noticed, and little disappointed by, is that there are no female Marauders. Don't know if its a fluff thing or something but in most box sets they give you a mix. Maybe they will do a blister of female Marauder with a Rifle at some point.

At least two of the minis are in action poses, which is cool but I prefer my converted version of Boarding Shotgun. The other three I like though.


The stat line for Marauder is what you would expect from a Medium Infantry unit. Everything beside MOV and ARM is one higher from a Grunt Line Trooper. What makes them very good though, are the special Skills. Marauders get Forward Deployment, Stealth, Dogged, Fireteam: Core and also Fireteam: Haris. Plus quite few weapon options and Specialist option, so there are plenty of different ways to utilize them.

Forward Deployment is very self-explanatory, lets you deploy outside of your Deployment Zone which can always be helpful. Especially for Missions where the objectives are just outside of your DZ.

Stealth I think is something people underestimate but I would highly recommend to always keep it in mind. It can help you get around enemy units as they can't react to your movements outside of their LoF and inside of the Zone of Control. Nothing says surprise like a Heavy Flamer to the back!

Dogged is also a good tool to have. If you really need to hold the line or keep advancing, it will keep them alive for a bit longer, either making your opponent spend more Orders or giving you more time to use them in Active Turn. But it can be hard to decide if you want to active Dogged or not, if you have Doctor or Paramedic nearby, since they will die at the end of that Turn and can't be healed from that.

The 4-2 MOV I used to think is a downside, and I did write about 4-2 vs 4-4 before, but it isn't as bad when you plan for it. If you focus Marauders on objectives in your half of the board and use faster units for anything over the middle line, it shouldn't be much of a downside. It can certainly be worked around and in Ariadna, you shouldn't struggle for Orders.

Fireteam: Core

If you are thinking about going for a Core Fireteam, its worth to decide if you want attack or defense. Marauder AVA is only 5 so if you are going for a full Fireteam of 5 (which you always should in my opinion), you won't get any more Marauders.

For defense I would definitely put in the Sniper and Heavy Rocket Launcher, at least one of each. It gives you decent long range AROs and the have MSV Lv1, which is not as good as Lv2 but it does make it easier to take care of Camouflaged units. Personally I would probably put in two Paramedics and a Boarding Shotgun. You will have a chance to bring people back to the fight and Heavy Flamers plus Mines will make it hard for your opponent to take out your Link from close range.

When it comes to attack, I personally really like Molotok because of the high Burst. In Caledonia it worked well for me in most games. In full Fireteam you should be on BS15 most of the time and with Burst 5 and AP ammo, even TAGs can be taken out. I would also put in the Heavy Rocket Launcher. Since its good range is 16" to 32", so you don't have to keep distance too much. Then I'd probably throw in two Medics and Shotgun again, I think its a good combo to cover your flanks.

If you have the Points to spare, having a Haris unit could be a good idea if you have other units in your army that have Fireteam: Core, like Grunts. Once you have only three Marauders left, you can change them to Haris and link a different unit as Core. This tends to burn your Command Tokens quick but it can surprise your opponent and give you advantage where needed.

Fireteam: Haris

This Fireteam option is great if you want something else to be your five-man Fireteam Core, or simply just activating three troops as one. It still gives you +1 Burst so it can be used for a small defense squad, like having a Haris unit, Paramedic and Sniper or Heavy Rocket Launcher. They can sit back, get the extra Burst in ARO and advance when needed.

Three-man combo like that is not a bad attack squad either, you will have at least one Heavy Flamers plus either Special Weapons and/or Specialist. I would recommend to have Paramedic in all Fireteams. Not only because of the healing option but because Specialist
s that can move while you are advancing with Special Weapons are always useful.

Before this box came out I used to run Haris, Paramedic and Boarding Shotgun. Make it a more close range unit, which I think is better for defense or sweeping enemy units that got to close to your DZ.

In either case, going for Haris lets you have two more Marauders which you can use on different parts of the board, like a Lieutenant in safe area or a lone Sniper covering a flank. 

Also do not underestimate the power of three Heavy Flamers in ARO. That is six templates, let that sink in. If you need to hold a building or some other close quarter area (hello Objective Room missions), your opponent will not want to run into that. Even Heavy Infantry and TAGs can't just risk it, few bad ARM saves and they burn to crisp. If you want to go really crazy, you can even go five Heavy Flamers (ten ARO templates!!) as a Core Fireteam!